// OPENBOX DOCS
Getting started
Import one local executable and launch it safely.
This path is for a first run with a local executable folder. Use a disposable folder if you are testing, so the experiment cannot touch real games.
The goal is a full loop: install, import one game, see it in the library, launch it, and confirm the session was recorded. It also proves the data model works: the entry you import is the entry that launches, and the session you play is the session that appears in history.
Before you start
- Follow Installation and start OpenBox. On Linux, run the AppImage, Flatpak, or source entry point (
./openboxorpython3 web_app.py). On Windows, double-clickopenbox.cmdor runpowershell -File .\openbox.ps1from the runtime directory; add--webto either one to force the browser app window instead of the native window. The full Windows path is in Windows. You should see the three-column workspace: filters on the left, an empty cover grid in the center, and the detail pane on the right. - Make one folder containing a single launchable file. On Linux that is an executable
.shfile; on Windows use an.exe(or a.cmd/.batscript). For a realistic first test on Linux, use a short script like this:
#!/bin/bash
echo "OpenBox launch works" && sleep 3
Make it executable (chmod +x). On Windows, scripts\install.ps1 already placed the runtime under %LOCALAPPDATA%\OpenBox\share\openbox, so any small .exe on your machine works as the test target. A non-executable file with no launch command is the most common first-launch failure, and the app now reports it explicitly instead of silently failing.
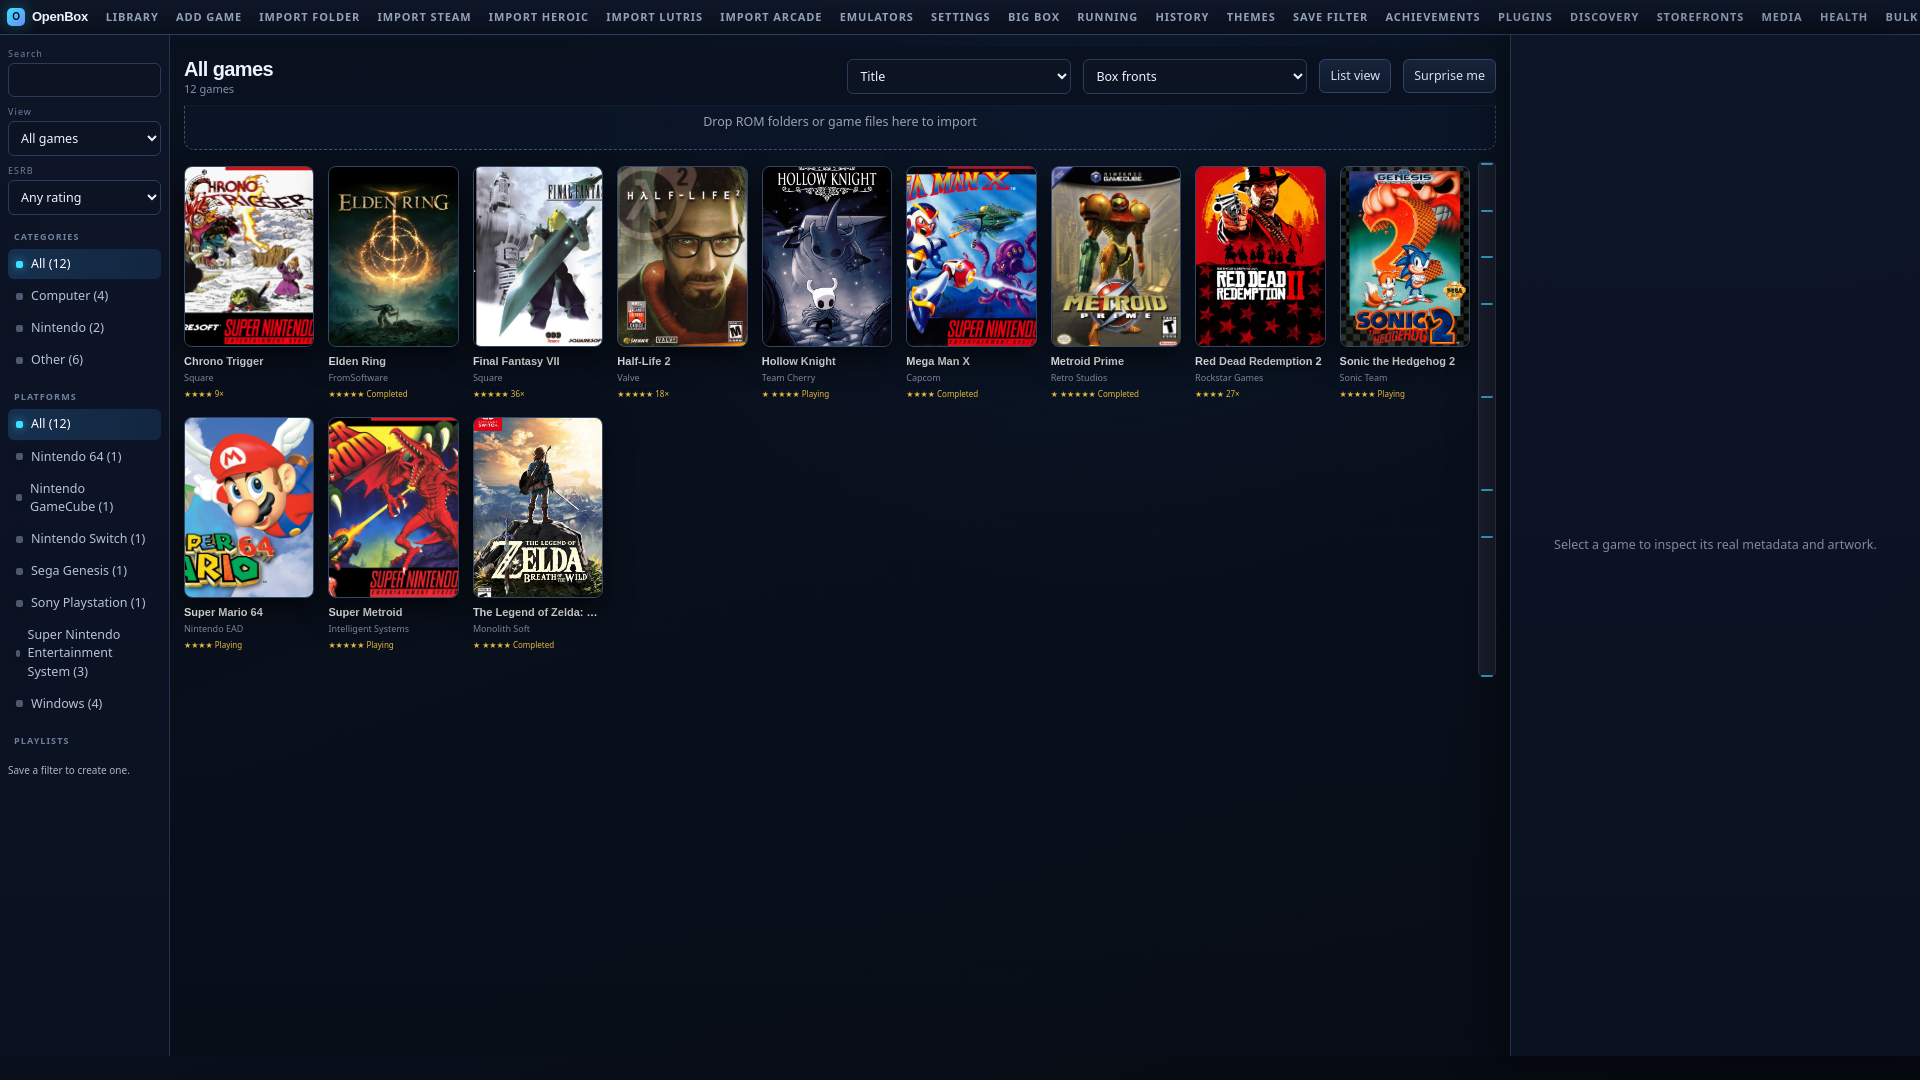
The workspace looks like this once you have a library entry: filters on the left, the grouped cover grid in the center, and the selected game's detail pane on the right.
Steps
- 1Install and start OpenBox. From the AppImage, Flatpak, or source on Linux, or from the signed portable package on Windows, as described on the Installation page and in Windows. When the library is empty, the Library Setup Center appears; you can close it and use the topbar buttons, or start from its guided Set up library preview-before-commit scan.
- 2Choose Set up library or Import Folder. Click Set up library in the topbar (or Import Folder). In the native window a folder picker dialog opens to select your games folder. In the browser fallback (
--web) the app prompts for the absolute path, for example/home/you/test-gameon Linux orC:\Games\test-gameon Windows. - 3Select a folder containing one launchable file. That is the executable
.shon Linux or the.exeon Windows from the previous section. Setup Center performs a read-only scan for supported files (.sh,.appimage,.exe,.iso,.rom, console extensions, and archives), presents a preview with storytelling progress, checks for duplicates, and commits cleanly without side effects. - 4Confirm the imported title in the library. A grid card appears with the game's name. The detail pane on the right shows the launch path, the platform, and metadata fields that you can enrich from the LaunchBox Games Database or edit manually.
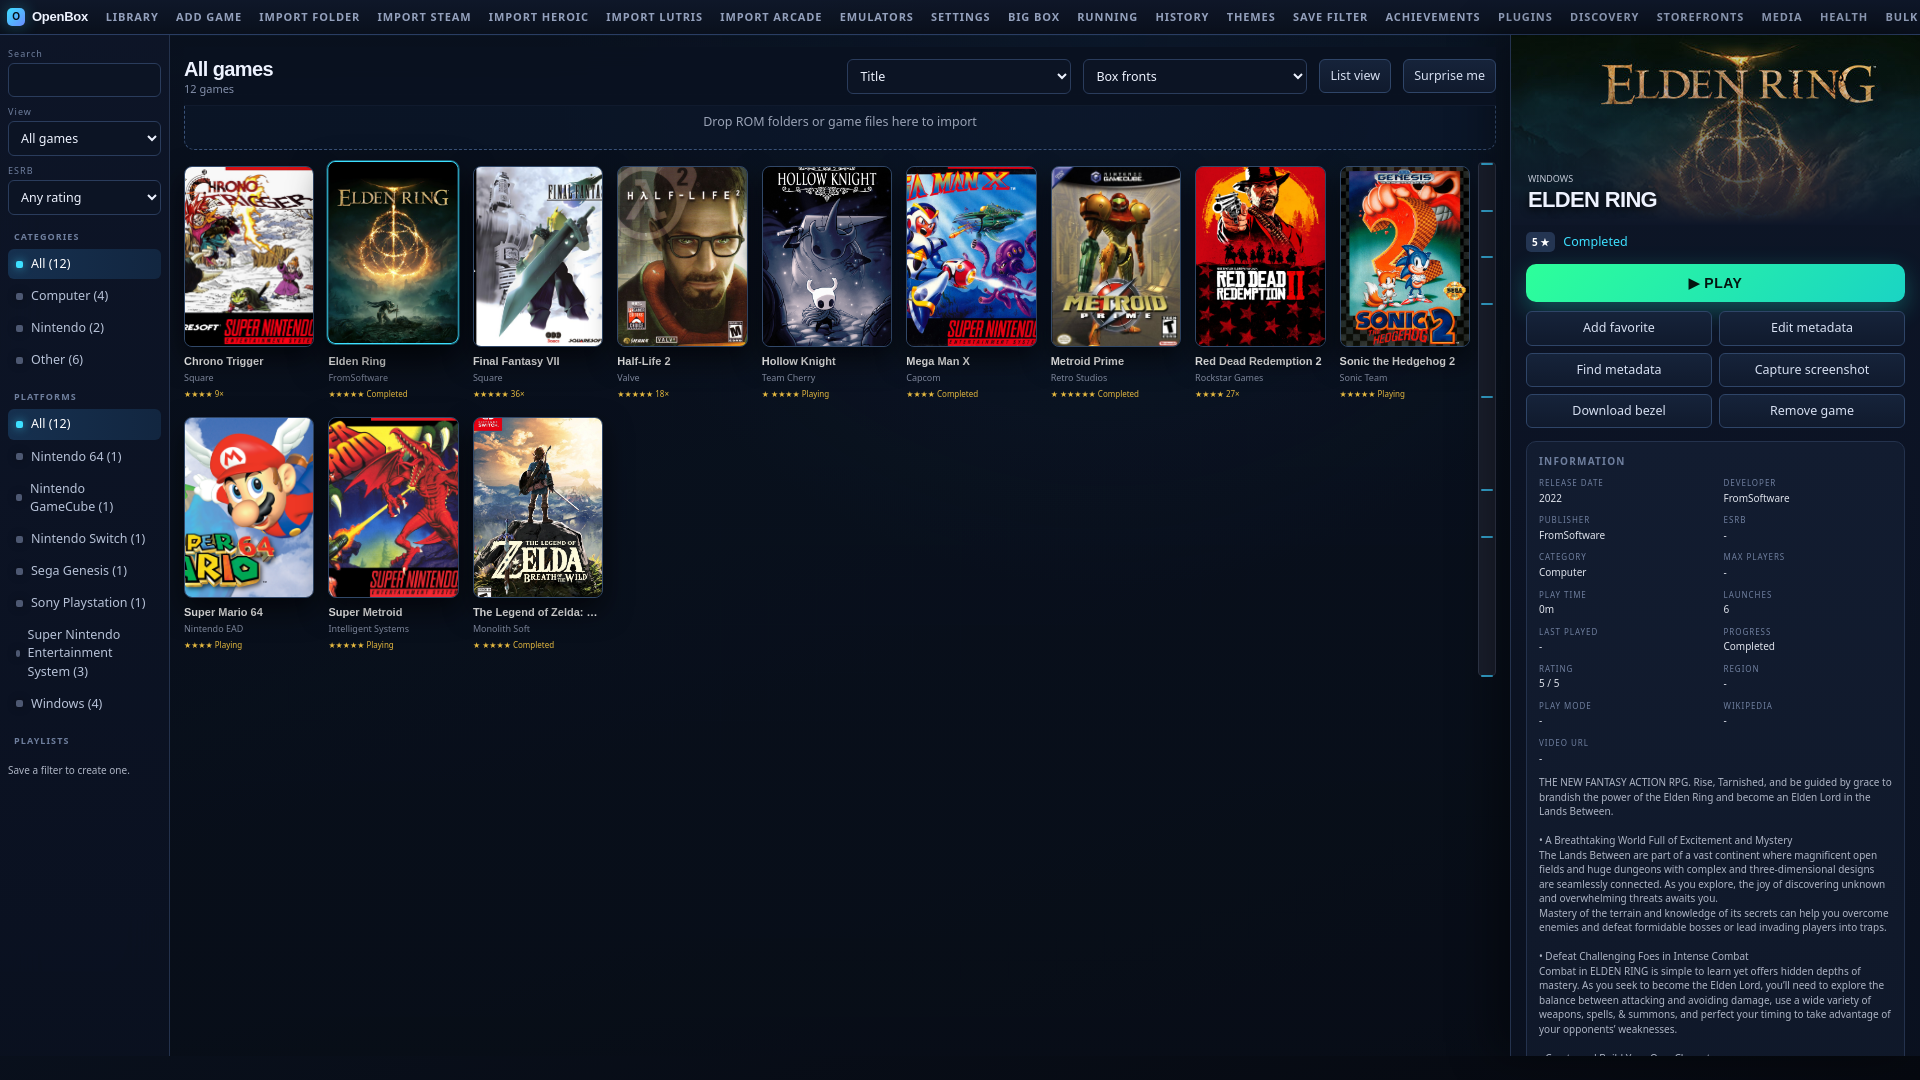
- 5Open the game card to view its details. Selecting the card opens its detail pane: the launch command, the launch profile for its platform, per-game overrides, save locations, and history stay together here. Launch Doctor validates the executable and dependencies before launch.
- 6Select PLAY and watch the session result. PLAY runs the game's launch command without a shell. On Linux, for a
.shfile, that meansbash <path>; on Windows a.exeruns directly. A lifecycle overlay appears ("Starting"), the process starts, and after it exits, the overlay reports the outcome: either "Session ended, play time and history were saved" for a clean exit, or the actual exit code for a failure. The session is recorded with start time, duration, and exit status.
Expected result
- One library entry, visible as a card in the grid.
- One completed session in the History view with a non-zero-free exit code and a play time of a few seconds.
play_countincremented andplaytime_secondsgrown on the game card.
ROMs are the deliberate exception: they require a configured platform emulator profile before they can launch. An .nes file with no emulator profile produces a Launch Doctor preflight notification until you set one, by design, so nothing half-configured ever runs.
Common failures and recovery
The game is missing after import
Check the folder path you selected. The import resolves ~ on Linux but does not guess; a wrong path imports nothing and reports it. Re-run Setup Center with the correct absolute path. Existing entries are never duplicated, so re-importing the same folder is safe.
PLAY is disabled or launch fails with a validation error
Open the game detail view or check Launch Doctor preflight notifications. Launch Doctor provides actionable fix buttons:
- "has no launch command and its file is not executable": make the file executable (
chmod +xon Linux; a Windows.exeneeds no permission bit), or assign an emulator profile. Launch Doctor displays an explanation and fix options. - "The configured path no longer exists": the imported file was moved or deleted. Point the game at the new path under Edit game, or re-import the folder.
- "Set a launch command for the platform": the platform has no profile. See Emulators and launching. On Linux, Launch Doctor can automatically install missing Flathub emulators; on Windows you install the Windows build of the emulator yourself and point the profile at its executable.
The session reports a failure
An immediate exit with a non-zero code reports "Session failed" with the exit code and a hint to check the launch command and emulator install. If your test script exits 0, the session is recorded as a normal end. If you never see the lifecycle overlay at all, check that the window still holds the current token: closing and reopening the window on the same server is fine. Starting a second server instance opens a new token, and the original window keeps working because the token lives in its URL.
The window did not open
Run the entry point from a terminal. In --web mode, OpenBoxGL prints http://127.0.0.1:PORT/?token=... and you can open that URL yourself. If the native window fails, the launcher prints an install hint for WebKitGTK and falls back to a chrome-less app window, then your default browser. On Windows the native window needs the WebView2 runtime and uses the native_host.exe the installer ships; a source checkout builds it with scripts/build_native_host_windows.ps1. If either the runtime or the host binary is missing, the launchers open the same UI in a browser app window instead, so Windows still works. The server binds to loopback only; nothing is exposed to the network.
I imported the wrong folder
Removing an entry is safe: select the game and use Remove game in the detail pane. Removal can optionally delete that game's media files, but it never deletes your game files on disk.
Data safety during this walkthrough
Every change the walkthrough makes is contained in the data directory:
- The import appends one entry to
library.json. - The launch appends one session to the history in the same file.
- Writes are atomic, owner-only, and go through the last-known-good
.bakcopy, so an interrupted write cannot corrupt the library.
Nothing is sent anywhere: no account, no telemetry, and no network traffic unless you click a metadata or media action. If you used a disposable folder, removing the entry leaves the data directory back where it started.
Next steps
- Windows for the full Windows install, launcher, and native-host path.
- Importing for Steam, Heroic, Lutris, ROM folders, and arcade sets.
- Emulators and launching for command tokens and platform profiles.
- Interfaces and data for where every file lives.
- Metadata and media for enrichment after the first import.
What's new in 1.11 through 1.15
- 1.11 — Every Second Counts: Quick Resume, Moments, clips/reels, Time Machine, Backlog Radio + natural query, Arcade Room/Museum kiosk, Household, Steam Bridge, ES-DE migration, SteamGridDB artwork, and local launcher trophies. Start with API 1.11 additions.
- 1.12 — Living Library: smart collections, per-game Story timelines (1h–100h milestones), per-game
launch_env/launch_confirm, opt-in weekly backups, SQLite self-enable at 5,000 games, and command-palette recents. Start with API 1.12 additions. - 1.13 — Windows support: Windows x86_64 joins Linux as a supported platform, installed from the signed portable package with
install.ps1. The native window uses WebView2 with the host the release ships compiled; a source checkout builds it withscripts/build_native_host_windows.ps1, and without it the launchers open the same UI in a browser app window. Data lives in%LOCALAPPDATA%\openbox-game-launcher, the in-app updater verifies the same key pin, checksum, and Ed25519 signature, and every bundled emulator definition carries its Windows executable name. See Windows and the release notes. Linux also gains fixes in this release: process liveness no longer usesos.kill(pid, 0)(which terminates the target on Windows), stored references use POSIX separators on Windows, and the metadata database closes cached SQLite handles before replacing the file. - 1.13.1 — Fixes: the sweep that made the Windows release usable: utility dialogs that opened invisibly, nested dialogs that closed all at once, a setup wizard that re-opened on every refresh, a session token dropped on reload, hidden tabs that could overwrite newer state, and "Reveal in Explorer" that never opened anything.
- 1.14 — Library intelligence: a 0–100 library health score, the Artwork Doctor, missing-file repair and duplicate merge, offline Game DNA search with a Title | Smart toggle, Plugins 2.0 with per-plugin trust, permission prompts, and generated settings forms, a personal backlog layer with your own star ratings, manual playtime sessions and dated notes, effortless metadata after import, ScreenScraper ROM-hash confidence, a thumbnail chooser, the Start in Big Box mode boot option with an on-screen keyboard, and Steam Bridge artwork.
- 1.15 — Finish the surface: motion that respects your reduced-motion setting, a readable light theme and the sixth stock theme High Contrast, signed emulator-definition updates in Settings → Emulators, Time Machine Compare, Settings → About, the Windows uninstaller, screen-reader support for the real library size, larger touch targets, and Story PNG export. See the release notes.